2012-02-18

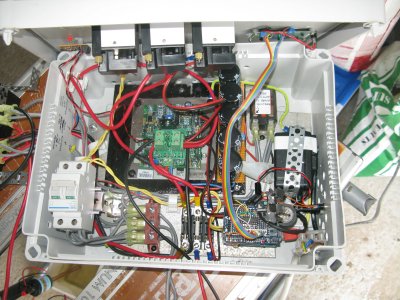
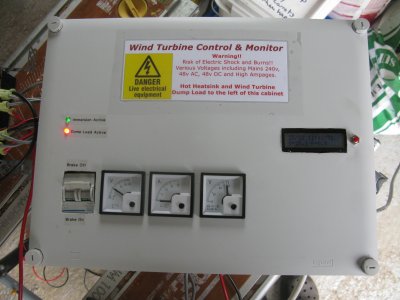
The Turbine Control and Monitor is finished. On the left is the outside showing the Brake Switch, AC Volts, DC Amps, DC Volts and LCD from the Arduino Monitor. The wind speed at the time was about 4 m/sec (8 knots) Inside the unit the LDR 48-30 controller is in the middle with the PSU for the Arduino and the Arduino 'Stack' bottom right. The rectifiers are just out of shot on the far left of the pictures fixed to a big heat sink.

2012-02-14

All balanced and painted up the finished turbine is on the big stand for testing once the electronics have been done.

2012-01-31

The Blades are fully finished and put onto the Turbine Assembly for the first time, ready for balancing. Thanks to Belinda for her help.

2012-01-31

The blades are finished and ready to be assembled. They need to be set up nice and level before screwing together.

2012-01-30

On the left the front face of each of the three blades has been carved out. On the right the back face is nearly finished on one of them. You can see how thin the blade has become. There is a lot of wood chippings. Great for starting the wood burner!

2012-01-29

The blades are carved by hand from 3 planks of Red Cedar with no visible knots. Precision and patience are required. We used a mallet and chissles, hand planes and a small orbital sander to do the job. Here are the very early stages of carving the first blade.

2012-01-28

Here we have the inner magnet disc in place on the hub, and the Stator set up ready for the outer magnet disc to be slowly let into place using threaded bars as a steadying device. The magnets atttract so strongly there has to be very good control or they will crash together possibly severing wayward fingers!

2012-01-21

There are two 10mm metal discs to hold 12 magnets each which will spin round on the hub either side of the Stator holding the coils producing 48 volts AC. These magnets are placed on the discs using a template cut from plywood. Once in position they are cast in fibreglass for protection against the elements. On the left there is some fibreglass in the mould. On the right the mould is full and ready for the lid.

2011-12-21

The coils are placed in a mould and connected correctly before being cast in fibreglass

2011-12-14

There are nine coils in the stator, all have to be hand wound on a frame made from plywood. The photo on the left shows a coil just started to be wound. There will be 110 turns per coil. On the right is a finished coil; weight 374 grams.

Pages